
Join us on

Please visit the Sitemap to see the full range of information on this site
MountainWalk.co.uk is produced by Trish Haill Associates Copyright
Have you climbed Ben Nevis, Snowdon or Scafell Pike? Or taken part in the Three Peaks Challenge? Or have a special walk you'd like to share? We'd love to here from you! Join us on Facebook or Send us an email.
Winter Mountain Walking Equipment
Choosing to climb in the mountains in winter brings its own challenges and rewards. The pluses that you're far less likely to be following a crowd, and will be able to enjoy the scenery that has been transformed by the colder weather into a magical winter wonderland.
On the minus side the mountain paths will be far more treacherous, and you are much more likely to have an accident unless you are properly equipped - and know how to use your equipment! Winter equipment includes ice axes and crampons, maps and compasses, torches, whistles and phones, warm clothing and food and drink!
There's a need to be even more aware of the current and forecast weather conditions and what the various risks might mean for your walk - and that includes whether there's a risk of avalanche.
This page takes you through the equipment you need, why you should have it and how to use it and some general tips to help you have an enjoyable - and safe - winter mountain walk!
Let's start with the most vital equipment that you should have with you.
In winter the freezing point can be at only 200 metres, or even less in severe weather. This means the paths will be icy, and possibly covered in deep snow. Walking with just normal boots (however good their grip) and walking poles will be insufficient to stop you if you start to slide on the slippery slopes. No walker should set out in winter without carrying both ice axe and crampons.
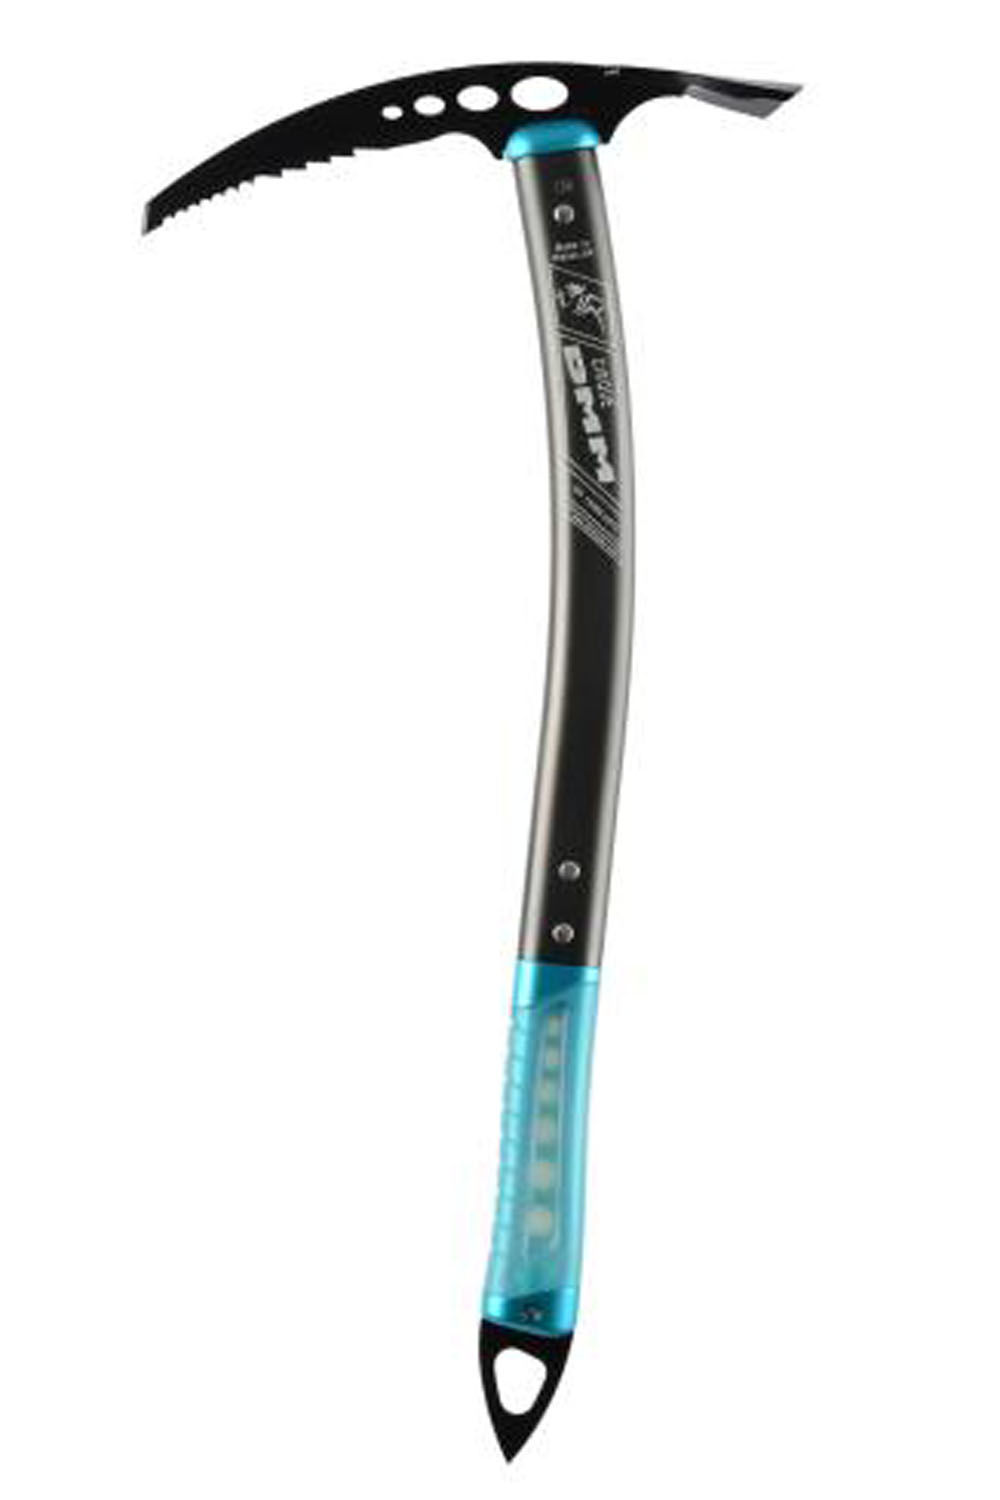
Ice axes are a tool to stop you slipping. It has a pick at one end of the axe head, and an adze on the other. The pick is what can help you sliding, and the adze is the flat end which is used for chopping steps in ice and impacted snow. At the end of the shaft is a point which can be used to help you balance.
The usual length of the axe is around 50 to 70 centimetres - not long enough to be used on level ground, but of great help when climbing slopes. The length of the pick you choose should suit your height. If the axe is too long it won't be as useful to stop you sliding. A person of average height will probably find a 60 centimietre length quite adequate.
The shafts should not be made of wood as they are not strong enough, and very lightweight ones should be avoided as if you are carving out steps you need to have a little weight behind it.
How important are ice axes? Well, let's put it this way, without an ice axe one wrong step could send you down the mountain to end up with serious injury - or worse - in no time at all.
There's a need to be even more aware of the current and forecast weather conditions and what the various risks might mean for your walk - and that includes whether there's a risk of avalanche.
This page takes you through the equipment you need, why you should have it and how to use it and some general tips to help you have an enjoyable - and safe - winter mountain walk!
Ice Axes and Crampons
Let's start with the most vital equipment that you should have with you.
In winter the freezing point can be at only 200 metres, or even less in severe weather. This means the paths will be icy, and possibly covered in deep snow. Walking with just normal boots (however good their grip) and walking poles will be insufficient to stop you if you start to slide on the slippery slopes. No walker should set out in winter without carrying both ice axe and crampons.
Choosing and Using Ice Axes
Ice axes are a tool to stop you slipping. It has a pick at one end of the axe head, and an adze on the other. The pick is what can help you sliding, and the adze is the flat end which is used for chopping steps in ice and impacted snow. At the end of the shaft is a point which can be used to help you balance.
The usual length of the axe is around 50 to 70 centimetres - not long enough to be used on level ground, but of great help when climbing slopes. The length of the pick you choose should suit your height. If the axe is too long it won't be as useful to stop you sliding. A person of average height will probably find a 60 centimietre length quite adequate.
The shafts should not be made of wood as they are not strong enough, and very lightweight ones should be avoided as if you are carving out steps you need to have a little weight behind it.
How important are ice axes? Well, let's put it this way, without an ice axe one wrong step could send you down the mountain to end up with serious injury - or worse - in no time at all.
Most ice axes have a strap which you should always loop round your wrist to prevent it getting lost. It can be a bit of a pain when you're walking up zig zags and needing to change your pick from hand to hand, but once on the straight put the strap back on - you don't want to see your pick sliding off into a gully!
There are two types of axe. Those graded T (technical) are tougher and more suited to heavy duty work as you can belay off them, and B (basic) graded ones are lighter and better for hill walking.
There are two types of axe. Those graded T (technical) are tougher and more suited to heavy duty work as you can belay off them, and B (basic) graded ones are lighter and better for hill walking.
Using an Ice Axe as an Emergency Brake
As well as being useful as a walking stick to help you balance, and a step cutting tool to help you climb up snow slopes, the ice axe has a very important function - to act as an emergency brake!
There is a technique for using the ice axe most effectively, and this should be practiced before you take to the hills. You should practice enough for the technique to become automatic - if you start to slide on the ice then seconds count.
To be ready to self arrest, or ice brake, you should be walking with you axe carried with the pick pointing backwards. When you start to slide act quickly. Roll onto your side and push the ice axe into the snow just above your shoulder. Then, rolling over onto your front use your body weight to push the pick in more firmly. Your head should be facing uphill, your face down and legs apart. Keep your feet up to avoid somersaulting.
Most accidents in winter are caused by people slipping and falling - knowing how to stop yourself is vital.
To practice using an ice axe choose a snowy slope with a safe run out and obviously not rocks sticking out and on a slope not more than 40 degrees.
Choosing and Using Crampons
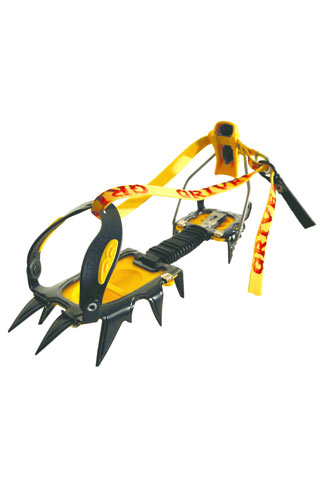
Crampons fit to your walking boots and feature downward and forward facing spikes to give improved traction when walking on ice or snow.
Not all walking boots are suitable for use with crampons so you may need to buy a new pair of boots for winter walking. Crampons which become loose and fall off can cause accidents at the worst, or at best hold up your companions as you constantly stop to adjust them.
There are three types of crampons which vary in stiffness and rigidity. For general hill walking you should look for types C1 or C2. C3 are only required if you are going to do some serious mountain climbing. Winter walking boots are graded in a similar way to crampons, from B1 to B3, but for a winter walk in snow and ice B1 will probably not be sufficient as they won't have a stiff enough sole to help you kick steps in the ice. If you do get B1 boots then you will need C1 crampons, but with B2 boots you can use either C1 or C2.
When walking with crampons you should walking confidently and firmly, flexing your ankle so that all the downward points bite into the surface. This is known as flat pointing and would be used on flat ground or a gentle slope. Front pointing is using the front points to kick steps into the snow or ice with the front of your boots, and you would use this method to ascend a steeper slope.
When descending a gentle slope, face forwards and keep your feet flat so that all of the downward points grip the snow. You should carry the ice axe in the braking position so that you're ready to react quickly should you start to slip. Facing into the slope could be better when the slope gets steeper, and make your descent by front-pointing in the same manner as for making an ascent.
When descending a gentle slope, face forwards and keep your feet flat so that all of the downward points grip the snow. You should carry the ice axe in the braking position so that you're ready to react quickly should you start to slip. Facing into the slope could be better when the slope gets steeper, and make your descent by front-pointing in the same manner as for making an ascent.
Emergency Items
If the worst does happen to you or a companion you need to be prepared with items to attract attention. Remember that if you need to ask for assistance from Mountain Rescue, wherever you are, simply ring 999.
Nights are longer in the winter, and walks can take longer than planned. Make sure you have a torch with you in case you get caught out. Torches should be carried by each member of the team - a group of people trying to descend a path with just one torch is just asking for trouble. Torches and whistles are both used to attract attention - the emergency signal is 6 long blasts on the whistle or torch flashes repeated at one minute intervals.
Proper Clothing
It sounds obvious to state that it will be very cold on the mountains - particularly on the summits. As well as the actual temperature you will need to factor in the wind chill. Weather conditions can change quickly, so breathable waterproof clothing is essential. You will expend a lot of effort, and so will need to wear an under layer that will draw sweat away from your skin - polyester or micro-fiber fabrics work well. Fleeces or wool jumpers can be worn over the top to keep warm or which can be taken off if you get too hot. Always remember the smaller items like thermal socks, gloves and a hat, and carry spares in case they get wet.
And don't forget sunglasses if it's going to be a clear day - sun reflecting off of pristine snow can be blinding.
Food and Water
You'll need sufficient fuel to be able to climb to the summit - snow and ice, or even muddy paths will make the going a lot harder than on a hot summer's day. And there's not even an open cafe on the summit of Snowdon to welcome you!
Avalanche Conditions
Although the United Kingdom is not necessarily somewhere you'd associate with the risk of avalanche, in 2013 there were avalanches that killed several people on the mountains of Scotland, and avalanche conditions making walking treacherous on the higher peaks of the Lake District. But wherever there are mountains, and heavy falls of snow combine with very windy conditions could lead to the risk of avalanche.
If there is a risk of avalanche publicised then only people who are experienced and able to recognise potential signs of danger should proceed into the affected area.
And final tips
Check the Met Office Mountain Weather Forecast before you set off, and be sensible. Understand the risks and only proceed if you are properly equipped (both with the right equipment, physical fitness and mental aptitude) to undertake this type of walk.
Be prepared to turn back. The mountain isn't going anywhere, and better to have enjoyed the walk you have had, than push on too far and have an accident. The cold, extra clothing and equipment, the sheer hard work of lifting one foot than the other through boggy mud, the constant kicking to form steps in the snow, will all take its toll, and maybe more than you thought. There's no loss of face in not achieving the summit - the majority of people wouldn't have even tried!
Have fun!
A walk to the summit in the winter is a real challenge, and will give you a massive sense of achievement. To make sure you have fun, just remember to be sensible.
The picture to the right, kindly provided by Wasdale Mountain Rescue, shows ground which anyone should avoid walking on.
Heavy snow has been blown onto a surface which it cannot stick to making the snow very unstable. The picture clearly shows deep cracks appearing on the snow. If you are walking and come across this phenomenon, which is known as windslab, you should turn back immediately. Do not proceed further as you could easily cause the whole of the snow to shift and start an avalanche.
Heavy snow has been blown onto a surface which it cannot stick to making the snow very unstable. The picture clearly shows deep cracks appearing on the snow. If you are walking and come across this phenomenon, which is known as windslab, you should turn back immediately. Do not proceed further as you could easily cause the whole of the snow to shift and start an avalanche.
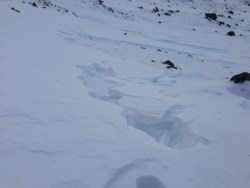
Windslab - unstable snow conditions. Picture provided by Wasdale Mountain Rescue
Crampons can be purchased at online stores such as Snow and Rock
When buying crampons they must be the correct size for your boots. A well fitted crampon will stay on your boot even without the straps being fastened.
Crampons have between 8 and 12 metal spikes but for winter mountain walking 10 to 12 spikes is the norm. Balls of snow can attach themselves to the crampons and the impacted snow can make your feet very heavy which quickly becomes tiring, as well as losing the effectiveness of the spikes. So the best pairs to buy have anti-balling plates which prevent snow building up.
How to use Crampons
Although walking with crampons on normal ground can feel very awkward, it is best to attach them before you really need them - waiting until you start slipping is leaving it too late.
You should have adjusted your crampons properly before you start on your walk. You will probably have manufacturer's instructions to follow, but in general the crampon should fit snuggly on the boot without the heel overhanging the back. The front points should protrude from the front of the boot as much as possible. You should do the straps up and trim any excess which might cause a trip hazard - but don't trim too much as you'll probably be putting crampons on whilst wearing gloves.
When you need to put them on whilst walking, find a convenient area of flat hard snow, or perhaps a rock. Tap away the snow from your boot and place your boot in the crampon whilst standing up, and put your whole weight on it before doing up the straps. If you try and do this sitting down you will probably find the straps are too loose, and the crampon not snug on your foot.
Other Winter Walking Equipment
If you go out ill equipped on a walk in the mountains in winter you could literally find yourself on a very slippery slope.
Apart from the essential ice axe and crampons, you should make sure you are properly equipped with the following:
Map and Compass
In winter mountains can become a vertical ice rink with paths indiscernible beneath snow and ice. Coupled with that, extremes of temperature between the ice and air can create foggy conditions, and snow showers can quickly become blizzards. Without navigation aids, and the skills to use them you can quickly become disoriented and lost. In poor weather try to keep all members of the group together - or if you do split up, make sure everyone has maps, compasses and map reading skills.
Slipping and sliding down a path where you know where you're heading is dangerous enough, but when you are lost you could easily fall over a precipice.
GPS can be inaccurate to a fair number of metres, so even if you have one with you, the back up of a map and compass is essential. Very cold weather can affect battery life so if you're using for phone for its GPS app remember to make sure you have sufficient battery at all times in case you have to make an emergency call.
See our other Walking Equipment Guides
Guide for Buying Walking Boots
Why use Walking Poles and Which to Buy
Good Rucksacks for Walking
Maps, Compasses and Other Useful Items
Wet Weather Wear - Waterproofs
Why should you buy a GPS
Winter Walking Equipment
Guide for Buying Walking Boots
Why use Walking Poles and Which to Buy
Good Rucksacks for Walking
Maps, Compasses and Other Useful Items
Wet Weather Wear - Waterproofs
Why should you buy a GPS
Winter Walking Equipment